Going solar is a significant home improvement, and like any major project, knowing what to expect makes the experience smoother and more enjoyable. At ProGreen Solar, we have refined our installation process through hundreds of installations across Colorado. Every step is designed for efficiency, transparency, and minimal disruption to your daily life.
This guide walks you through the entire process from your initial inquiry to the moment your system starts producing clean electricity.
Overview: The Solar Installation Timeline
The complete process typically takes four to eight weeks from signing to activation. Here is the high-level timeline:
| Phase | Duration | What Happens |
|---|---|---|
| Consultation & Site Assessment | 1-3 days | Free evaluation of your home and energy needs |
| System Design & Proposal | 3-5 days | Custom system design with detailed pricing |
| Contract & Financing | 1-3 days | Sign agreement and finalize financing |
| Permitting | 1-3 weeks | Building permits and utility applications |
| Installation | 1-3 days | Physical panel and equipment installation |
| Inspection | 3-10 days | Municipal building inspection |
| Utility Interconnection | 1-3 weeks | Utility approval and meter swap |
| System Activation | Same day | You start generating solar electricity |
Now let us break down each phase in detail.
Phase 1: Free Consultation and Site Assessment
The Initial Conversation
Your solar journey starts with a conversation. When you contact ProGreen Solar or use our online calculator, one of our solar consultants will discuss:
- Your current electricity usage and bills
- Your goals (maximize savings, achieve energy independence, reduce carbon footprint)
- Your budget and financing preferences
- Basic questions about your home (roof age, orientation, any known issues)
This initial conversation typically takes 15 to 30 minutes and can happen by phone, video call, or in person at your home.
Site Assessment
For an accurate proposal, we need to evaluate your specific property. This assessment can be done in two ways:
Remote assessment: Using high-resolution satellite imagery, LiDAR data, and advanced design software, we can model your roof's dimensions, pitch, orientation, and shading profile without setting foot on your property. This approach provides fast results for most homes.
In-person assessment: For complex roofs, significant shading, or at the homeowner's preference, a technician visits your home. They inspect the roof condition, measure the electrical panel capacity, evaluate the attic structure, and assess optimal conduit routing. An in-person visit takes about one to two hours.
During the site assessment, we also:
- Review your last 12 months of electric bills (you can share these digitally)
- Assess your main electrical panel to ensure it can accommodate a solar connection
- Identify the optimal panel layout for maximum production
- Note any potential complications (vents, skylights, complex roof geometries)
Phase 2: Custom System Design and Proposal
Engineering Design
Based on the site assessment, our engineering team designs a system optimized for your specific home. This includes:
- Panel selection — Choosing the right panels (REC, Meyer Burger, QCell, or others) based on your roof space, budget, and performance goals
- Inverter selection — Recommending Enphase microinverters or SolarEdge optimizers based on your roof layout and shading
- Panel layout — Determining exact placement of each panel using CAD software, optimizing for production while meeting setback and fire code requirements
- Electrical design — Routing conduit, sizing wiring, and planning the connection to your electrical panel
- Production modeling — Running detailed simulations using software like PVWatts or Helioscope, factoring in your roof's specific characteristics, local weather data, and shading analysis
Your Proposal
You receive a comprehensive proposal that includes:
- System specifications (panel count, wattage, inverter type)
- Detailed production estimate (monthly and annual kWh)
- Complete pricing breakdown with no hidden costs
- Federal tax credit calculation
- Available Colorado incentives and rebates
- Multiple financing scenarios (cash, loan, lease)
- 25-year savings projection with ROI analysis
- Warranty details for every component
For guidance on understanding every line of this document, read our How to Read Your Solar Proposal guide.
Proposal Review
Your consultant walks through the proposal with you, answering questions and making adjustments. Want to add a battery? We can model that. Prefer a different panel brand? We will reconfigure. This is your system — we customize it until you are completely satisfied.
Phase 3: Contract and Financing
Signing the Agreement
Once you approve the system design and pricing, we finalize the agreement. Our contracts are straightforward and include:
- Complete scope of work
- Equipment specifications
- Production guarantee
- Payment schedule
- Warranty terms
- Timeline expectations
Financing Setup
If you are financing your system, we help you through the application process:
- Solar loans: Applications are typically approved within 24 to 48 hours. Many of our lending partners offer $0 down and competitive rates.
- Cash purchase: A simple deposit to initiate the project, with the balance due at completion.
- Leases or PPAs: Third-party ownership paperwork is typically quick to process.
For a detailed comparison of financing options, read Solar Loans vs. Leases vs. PPAs or learn about $0 Down Solar.
Phase 4: Permitting
Building Permits
Solar installations require permits from your local building department. ProGreen Solar handles the entire permitting process — you do not need to visit any government offices or fill out any forms.
We prepare and submit:
- Structural engineering calculations (verifying your roof can support the panels)
- Electrical plans showing the complete system layout
- Site plans showing panel placement relative to property boundaries and fire access
- Equipment specification sheets
Typical timeline: Most Colorado municipalities approve solar permits within one to two weeks. Some jurisdictions offer expedited review for solar projects.
Utility Interconnection Application
Simultaneously, we submit an interconnection application to your utility company. This notifies them that you will be installing a grid-tied solar system and requests approval to connect. The utility reviews the application and schedules the eventual meter swap.
What the utility checks:
- Your service type and capacity
- Transformer capacity in your neighborhood
- Compliance with their interconnection standards
This process runs in parallel with the building permit, so it does not add time to your timeline.
HOA Approval (If Applicable)
If you live in a community with a homeowners association, Colorado law protects your right to install solar panels. HOAs cannot prohibit solar installations, but some require architectural review. We can prepare and submit the necessary documentation on your behalf.
Colorado's Solar Rights Act significantly limits the restrictions HOAs can impose — they cannot require you to place panels in a location that reduces output by more than 10 percent, and they cannot require approval processes that take longer than 60 days.
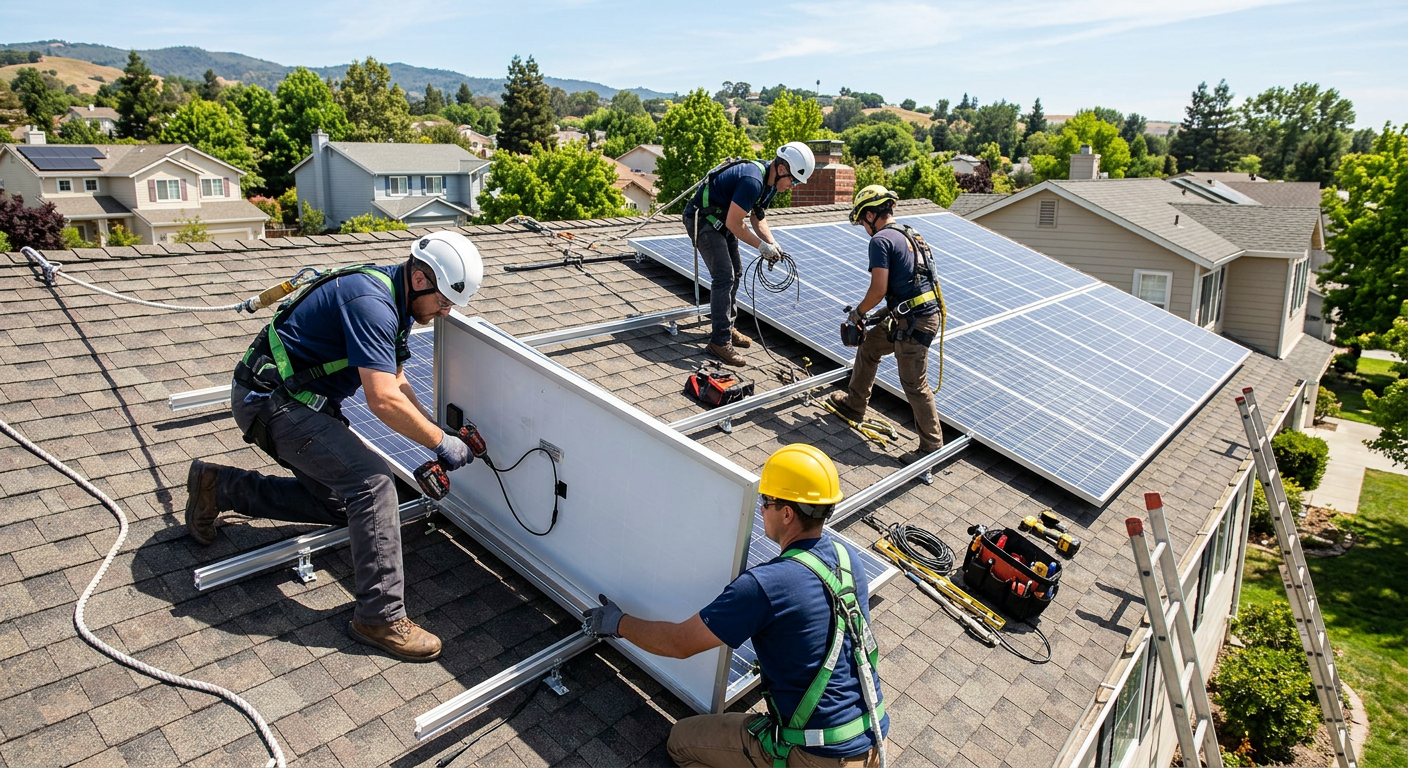
Phase 5: Installation Day
This is the exciting part — the day your home becomes a power plant.
Pre-Installation Preparation
Before the crew arrives, here is how to prepare:
- Clear any obstacles near the exterior electrical panel
- Ensure driveway access for the installation vehicle
- Secure pets indoors or in a contained area
- Let your neighbors know (installation involves some noise and activity)
- You do not need to be home, but we recommend being available by phone
Morning: Racking and Mounting
The crew arrives early (typically 8 AM) and begins with the racking system:
- Roof preparation — The crew inspects the roof and marks panel positions according to the engineering plan.
- Mounting rails — Aluminum rails are attached to the roof rafters using lag bolts with waterproof flashing. Each penetration is sealed with roofing compound and a proprietary flashing that integrates with your shingles.
- Quality check — Every mount point is verified for structural integrity.
Midday: Panel Installation
With the racking in place, panels go up quickly:
- Panel placement — Each panel is secured to the rails with clamps.
- Wiring — Panels are connected to each other and to the inverter using weather-rated MC4 connectors.
- Microinverter/optimizer mounting — If using Enphase or SolarEdge, individual components are attached beneath each panel.
Afternoon: Electrical Work
The final step connects everything to your home:
- Conduit routing — Wiring runs from the roof to your inverter location (typically on an exterior wall near the electrical panel).
- Inverter installation — The central inverter (if applicable) is mounted and wired.
- Electrical panel connection — A dedicated solar breaker is installed in your main panel.
- Monitoring setup — The monitoring gateway is connected and configured.
- System testing — The crew verifies every connection and runs diagnostic tests.
What to Expect
- Duration: Most residential installations are completed in one to two days. Larger or more complex systems may take three days.
- Noise level: Moderate. Drilling into roof rafters is the loudest part, comparable to other construction activity.
- Interior disruption: Minimal to none. The electrical panel connection requires briefly shutting off your home's power (30 to 60 minutes).
- Cleanup: The crew cleans up all materials and debris before leaving. Your property should look the same as before, except for the panels on your roof.
Phase 6: Inspection
After installation, your local building inspector reviews the work:
- Verifying electrical connections meet code
- Confirming structural attachment is proper
- Checking that all permits match the installed system
- Reviewing safety features (rapid shutdown compliance, labeling)
ProGreen Solar schedules the inspection and is present to address any inspector questions. In our experience, inspections are straightforward when the installation follows engineered plans — which ours always do.
Timeline: Inspections are typically scheduled within 3 to 10 business days of installation completion.
Phase 7: Utility Interconnection
With the building inspection passed, we notify your utility that the system is ready for interconnection:
- Utility review — The utility confirms the system matches the approved interconnection application.
- Meter swap — A utility technician visits your home to install a bidirectional net meter (if not already in place). This takes about 30 minutes.
- Permission to Operate (PTO) — The utility issues formal approval to operate your solar system and connect it to the grid.
Timeline: This is often the longest single wait in the process. Xcel Energy and other Colorado utilities typically process interconnection in one to three weeks.
Phase 8: System Activation
The moment you have been waiting for. Once you receive Permission to Operate:
- We activate your system — Often remotely, through the monitoring platform.
- You download the monitoring app — Enphase Enlighten or SolarEdge mySolarEdge, depending on your inverter.
- You start generating electricity — Watch your production in real time as your panels begin offsetting your energy costs.
Your First Day of Solar
The first time you open your monitoring app and see electricity flowing from your panels is genuinely exciting. You can watch your production climb as the morning sun strengthens, see your home's consumption, and track the surplus flowing to the grid. It is a tangible, real-time display of your investment at work.
After Installation: Ongoing Support
ProGreen Solar's relationship with you does not end at activation:
- Monitoring: We monitor your system's performance and alert you to any issues.
- Warranty support: We handle all warranty claims with equipment manufacturers on your behalf.
- Annual check-ups: We offer maintenance plans that include annual inspections and cleaning.
- System expansion: If your needs grow (added an EV, finished the basement, new hot tub), we can add panels or a battery to your existing system.
Common Questions About the Installation Process
Will the installation damage my roof?
No. When installed correctly (and ProGreen Solar always installs correctly), solar panels actually protect the roof beneath them from UV exposure and weather. Our mounting system uses flashed lag bolts that create a weatherproof seal stronger than the original roof surface.
Do I need to be home during installation?
You do not need to be home for the entire installation, but we recommend being available during the first hour and the electrical connection phase. Being reachable by phone throughout the day is sufficient.
What if it rains or snows on installation day?
We monitor weather closely and will reschedule if conditions are unsafe. Light rain or cold temperatures are generally not a problem. Snow or thunderstorms require rescheduling for crew safety.
How long until I see savings?
You begin saving the moment your system is activated. Your first full month of solar production will noticeably reduce your electric bill. The total monthly savings depend on your system size, energy usage, and the season.
Start Your Solar Journey Today
The installation process is straightforward, professionally managed, and minimally disruptive. From your first call to your first kilowatt-hour, the ProGreen Solar team handles every detail.
Get your free solar estimate or call us at (303) 484-1410 to start the process. Your home could be generating clean, money-saving solar electricity in as little as four weeks.